Image configurations
IMAGO provides different image configurations depending on the requirements. Two image configurations 'a' and 'b' are currently provided for the VisionBox AI:
| Configuration | Description |
| a | Basic image with Xfce desktop environment
- Ubuntu base system
- Additional packages: openssh-server, openssh-client, ntp, snmpd, avahi-daemon, screen, htop, python3, ...
- Software development packages: gcc, g++, gdb, make, ...
- NVIDIA Jetson Linux Driver Package
- Packages provided by IMAGO:
- Bootloader for the VisionBox AI: bootloader-visionbox-ai
- NVIDIA Linux kernel with customized kernel configuration and device tree:
- Standard kernel (default): linux-image-…-visionbox-ai-…, linux-headers-…-visionbox-ai-…
- Real-time kernel (PREEMPT_RT): linux-image-…-visionbox-ai-rt-…, linux-headers-…-visionbox-ai-rt-…
- Image < v2.0: NVIDIA Display driver using the DKMS build system: nvidia-l4t-display-dkms
- IMAGO Linux SDK: imago-sdk
- imago-snmpd-update: Linux service which updates the file /etc/snmp/snmpd.conf.local to make the device discoverable by the VIBFinder tool. The service additionally sets the host name to the device's serial number during boot.
- imago-archive-keyring: public IMAGO APT repository deb.imago.tech for online SDK updates
|
| b | Basic image without desktop environment
- Ubuntu base system
- Additional packages: openssh-server, openssh-client, ntp, snmpd, avahi-daemon, screen, htop, python3, ...
- Software development packages: gcc, g++, gdb, make, ...
- NVIDIA Jetson Linux Driver Package
- Packages provided by IMAGO:
- Bootloader for the VisionBox AI: bootloader-visionbox-ai
- NVIDIA Linux kernel with customized kernel configuration and device tree:
- Standard kernel (default): linux-image-…, linux-headers-…
- Real-time kernel: linux-image-…-visionbox-ai-rt-…, linux-headers-…-visionbox-ai-rt-…
- IMAGO Linux SDK: imago-sdk
- imago-snmpd-update: Linux service which updates the file /etc/snmp/snmpd.conf.local to make the device discoverable by the VIBFinder tool. The service additionally sets the host name to the device's serial number during boot.
- imago-archive-keyring: public IMAGO APT repository deb.imago.tech for online SDK updates
|
- Note
- The Nvidia JetPack SDK is currently not pre-installed. See Installing JetPack for more information.
- The FPGA firmware is not part of the Linux image and will therefore not be updated by image recovery.
Mass storage devices
The VisionBox AI supports the following mass storage devices:
| Device | Partition | Mount point | Filesystem | Description |
| eMMC flash | /dev/mmcblk0p1 | / | Ext4 | Root filesystem |
/dev/mmcblk0p2 ...
/dev/mmcblk0p14 | | | Firmware partitions |
| SD card | /dev/mmcblk1p1 | /media/sdcard | Auto | Mounted during first access to /media/sdcard |
| M.2 NVMe SSD | /dev/nvme0n1p* | | | The M.2 SSD is optional |
| USB flash drive | /dev/sd* | | | |
- Note
- The mount points and options are configured in the file /etc/fstab.
IMAGO software updates
The public Debian repository at deb.imago.tech enables online installation and updates of packages provided by IMAGO. The repository is already prepared in the Linux images.
The following software packages are currently supported:
- imago-sdk
- imago-snmpd-update
Example for installing or updating the IMAGO SDK:
apt update
apt install imago-sdk
Installing JetPack
The NVIDIA JetPack SDK is not included in the provided Linux images, but the online APT repository provided by NVIDIA is already prepared.
Issue the following commands on the target system to install all JetPack components:
apt update
apt install nvidia-jetpack
There are also meta-packages available which can be used to install specific development or runtime components only:
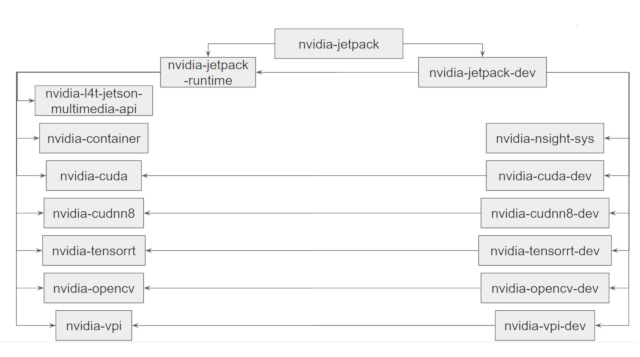
JetPack meta-packages
- Note
- It's highly recommended to install only the required runtime packages for production (nvidia-jetpack-runtime or sub-packages). Development packages will increase storage requirements on the device and the size of backup images substantially.
See also: List of JetPack Debian Packages
Installing / upgrading CUDA
Ubuntu 22.04 / Jetpack 6
The CUDA 12.x toolkit is provided by the JetPack SDK 6 meta-package nvidia-cuda-dev:
~# apt update
~# apt install nvidia-cuda-dev
~# /usr/local/cuda/bin/nvcc --version | grep release
Cuda compilation tools, release 12.6, V12.6.68
A more recent version can be installed independently from the version provided by JetPack, see:
- Note
- JetPack 6 can't be installed after the additional CUDA repository is installed on the system. JetPack has to be installed first to avoid dependency problems.
Ubuntu 20.04 / Jetpack 5
The CUDA 11.4 toolkit is included in JetPack SDK 5.x. CUDA version 12.2 can be installed independently from the version provided by JetPack. The required APT repository is already prepared in the system. Issue the following commands on the target system to install the newest compatible CUDA version:
~# apt update
~# apt install cuda
CUDA samples
The CUDA samples can be downloaded from the following GitHub repository:
github.com/NVIDIA/cuda-samples
Install dependencies, then clone and checkout cuda-samples Git repository for the installed CUDA version:
~# apt install git cmake libfreeimage-dev libdrm-dev
~# git clone https://github.com/NVIDIA/cuda-samples.git
~# cd cuda-samples
~# git checkout v12.5
Build samples:
~# make -j $(nproc)
~# ls bin/aarch64/linux/release/
Run the deviceQuery example:
~# bin/aarch64/linux/release/deviceQuery
Real-time Linux kernel
The real-time Linux kernel (PREEMPT_RT) is provided by the packages linux-image-…-visionbox-ai-rt-… and linux-headers-…-visionbox-ai-rt-…. It's already pre-installed in the system, but not selected automatically during boot. The kernel can be selected interactively on the serial console or DisplayPort with USB keyboard during the boot process:
VisionBox AI boot options
0: Linux 5.15.148-visionbox-ai-rt-36.4.4
1: Linux 5.15.148-visionbox-ai-36.4.4
Press 0-1 to boot selection within 2.0 seconds.
Press any other key to boot default (Option: 1)
The default setting for the kernel can be changed by modifying the configuration file /boot/extlinux/extlinux.conf and changing the line starting with 'DEFAULT ...'.
Thermal considerations
The maximum operating temperature depends on the configured power mode, the system workload, and the mounting situation. Adequate cooling must be provided to maintain nominal performance. The temperature range should be verified for each application.
- Warning
- The device's surface can get very hot, there is a risk of injury!
The following thermal trip zones are used for all thermal zones of the Orin SoC:
| Temperature threshold | Type | Description |
| 70°C | Active | Hot surface warning |
| 99°C | Passive | Clock throttling is used to reduce power consumption |
| 104.5°C | Critical | Software shutdown is triggered |
- Note
- Take a look at Jetson Power Modes to optimize power consumption for the application.
- Run the python script /usr/share/nvpmodel_indicator/thermal_throttle_alert.py to monitor hot-surface and throttling events.
- The command line tool tegrastats can be used to verify temperatures, frequencies and power consumption.
- Also take a look at the third-party tool jtop which is provided by the python package jetson-stats.
Jetson Power Modes
The Jetson AGX Orin module can be operating in different power modes. Each mode provides a different power budget by limiting the number of cores and the frequency for CPU, GPU and other SoC units.
Available power mode presets are defined in the configuration file /etc/nvpmodel.conf. Custom modes can be added to optimize the power consumption depending on the application requirements.
Example section in /etc/nvpmodel.conf for Mode 2 at 30W for the AGX Orin 32GB:
< POWER_MODEL ID=2 NAME=MODE_30W >
CPU_ONLINE CORE_0 1
CPU_ONLINE CORE_1 1
CPU_ONLINE CORE_2 1
CPU_ONLINE CORE_3 1
CPU_ONLINE CORE_4 1
CPU_ONLINE CORE_5 1
CPU_ONLINE CORE_6 1
CPU_ONLINE CORE_7 1
TPC_POWER_GATING TPC_PG_MASK 240
GPU_POWER_CONTROL_ENABLE GPU_PWR_CNTL_EN on
CPU_A78_0 MIN_FREQ 729600
CPU_A78_0 MAX_FREQ 1728000
CPU_A78_1 MIN_FREQ 729600
CPU_A78_1 MAX_FREQ 1728000
GPU MIN_FREQ 0
GPU MAX_FREQ 612000000
GPU_POWER_CONTROL_DISABLE GPU_PWR_CNTL_DIS auto
EMC MAX_FREQ 0
DLA0_CORE MAX_FREQ 1369600000
DLA1_CORE MAX_FREQ 1369600000
DLA0_FALCON MAX_FREQ 729600000
DLA1_FALCON MAX_FREQ 729600000
PVA0_VPS MAX_FREQ 512000000
PVA0_AXI MAX_FREQ 358400000
Predefined power modes for the AGX Orin 32GB and AGX Orin 64GB module are described in the NVIDIA Jetson Linux Developer Guide: Supported Modes and Power Efficiency
- Note
- The default power mode for the VisionBox AI is MAXN (mode 0), which means no restrictions in cores and frequency, but hardware throttling may be used to limit the power consumption to the following TDP budgets:
- AGX Orin 32GB: 40W
- AGX Orin 64GB: 60W
Use the command line tool nvpmodel to query or change the power model, see Power Mode Controls for a detailed description:
~# nvpmodel -q
NV Power Mode: MAXN
0
~# nvpmodel -m 3
~# nvpmodel -q
NV Power Mode: 40W
3
- Note
- The selected mode persists across power cycles.
- A reboot may be required if the number of active cores is changed.
Ext4 journaling filesystem
The ext4 filesystem is used for the root partition mmcblk0p1 in the eMMC flash.
Ext4 supports three data journaling modes:
- data=writeback
Journaling is only applied for metadata. Incorrect data may appear in files which were written shortly before a crash.
- data=ordered
All data is forced directly out to the main filesystem prior to its metadata being committed to the journal. This technique guarantees that either the old or the new file contents will persist on disk. But ext4's delayed allocation of blocks increases the potential for data loss in programs that have not been specifically written to call fsync() when the programmer wants to ensure data has been flushed entirely to disk.
- data=journal
This mode disables delayed allocation of written data. This mode is most robust against data loss, but also has a significant impact on write performance.
The journaling mode is determined during the mount process of the root filesystem. The mode is stored in the ext4 superblock information which is not part of the Linux image. The default mode for delivered devices is data=journal, because data=ordered does not provide the best safeness against data loss.
The active journaling mode can be checked by running the following console command:
~# cat /proc/fs/ext4/mmcblk0p1/options | grep "data="
data=journal
The following command can be used to configure data=ordered mode manually:
~# tune2fs -o journal_data_ordered /dev/mmcblk0p1
data=journal mode can be enabled by running the following command:
~# tune2fs -o journal_data /dev/mmcblk0p1
The filesystem will be mounted with the new mode after reboot.
The superlock information is initially configured during installation of images by the install scripts (Remote_OS_Install.cmd, Remote_OS_Install.sh, Local_OS_Install.sh). The default mode is data=journal. The scripts accept the parameter -o to change the mode to data=ordered during installation.
References
 1.8.18