VisionCam XM Linux  2023-11-13
Getting started

Requirements

  • 17-pin power and I/O cable
  • 24 V power supply
  • Ethernet connection between host and device (through Ethernet switch or directly attached)
  • A Windows or Linux host with a terminal program like ssh, MobaXterm or PuTTY
  • Internet connection if software updates are desired

IMAGO also offers the following accessories for the VisionCam XM:

  • I/O cable with terminal block (break-out adapter for easy installation and testing)
  • M12 Ethernet cable with RJ-45 plug
  • Plug-in power supply
  • C-mount or S-mount lenses
  • Lens tube

Power and I/O connector

A 24 V power supply must be connected to the 17-pin power and I/O connector. The device will boot automatically into Linux after applying power.

The following table shows the pin assignemnt of the connector:
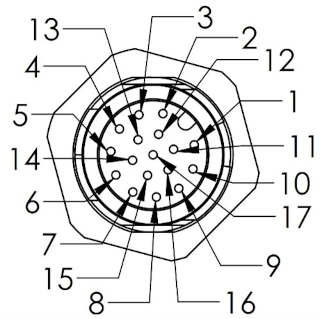
IO connector
Pin Function Wire color
1 Power supply GND brown
2 Power supply (+) blue
3 RS-232 TX white
4 RS-232 RX green
5 Digital IN0 pink
6 Digital IN1 yellow
7 Digital IN Common GND black
8 Digital OUT0 gray
9 Digital OUT1 red
10 Digital OUT2 purple
11 Digital OUT3 gray / pink
12 Digital OUT Common VCC red / blue
13 Reserved white / green
14 Reserved brown / green
15 External LED (+) white / yellow
16 External LED (-) yellow / brown
17 Reserved white / gray
Note
The bootloader U-Boot uses the serial interface during the boot process. It can be in- terrupted if a character is received on the RS-232 interface after power-on. The device will then wait for user input and not boot into the OS.

VisionCam login

The following Linux login methods are available:

Two user accounts are pre-installed in the Linux system:

User Password Description
root vision Superuser account
visioncam vision Regular user account
Note
We recommend changing the password of both accounts by using the shell command passwd.

Network configuration

The network interface of the VisionCam is configured for DHCP by default.

If no DHCP server is present, the device will fall back assigning a link-local IPv4 address after some time. The link-local address for IPv4 is in the range 169.254.0.0/16.

Note
  • In order to access a device with a IPv4 link-local address, the host must also be configured to use a link-local IPv4 address.
  • Windows will automatically fall back to a link-local IPv4 address if no DHCP server is answering the request. So a device can be connected directly to the Windows host if both have DHCP enabled.
  • A link-local address is always assigned for the IPv6 protocol (fe80::/10) and can always be used if IPv6 is enabled for the host (see Device access via mDNS name).

VIBFinder tool

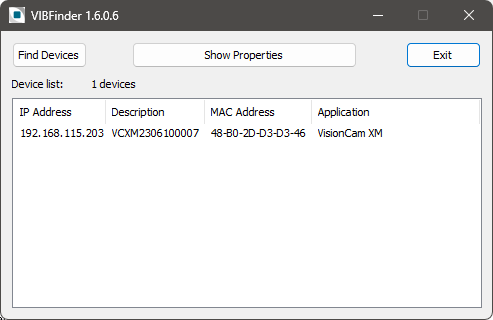
IMAGO's VIBFinder tool for Windows can be used to discover the device on the local network by using the SNMP protocol (IPv4 only):

VIBFinder tool

Device access via mDNS name

Instead of using the device's IPv4 address, it's also possible to establish a connection by using the mDNS host name. The name consists of the device's serial number in the domain .local.

Example:

~# ping VCXM2209000711.local
PING VCXM2209000711.local (192.168.115.203) 56(84) bytes of data.
64 bytes from 192.168.115.203: icmp_seq=1 ttl=64 time=0.020 ms
64 bytes from 192.168.115.203: icmp_seq=2 ttl=64 time=0.045 ms
64 bytes from 192.168.115.203: icmp_seq=3 ttl=64 time=0.047 ms

Example: VCXM2209000711.local

Note
  • mDNS is supported since Windows 10. Linux hosts require the libnss-mdns package.
  • mDNS may resolve the name to a IPv4 or IPv6 address.

Static IPv4 address configuration

A static IP address can be assigned by modifying the file /etc/network/interfaces. This can also be accomblished by using the RS-232 Linux console login.

The file shows some commented lines for setting a static IP address:

# DHCP configuration
# ------------------
auto eth0
iface eth0 inet dhcp
# Static IP configuration
# -----------------------
#auto eth0
#iface eth0 inet static
#address 192.168.1.2
#netmask 255.255.255.0
#gateway 192.168.1.1

When using a static IP address, the file /etc/resolv.conf.tail can be created to configure a DNS server, for example:

~# echo "nameserver 8.8.8.8" > /etc/resolv.conf.tail

The service dhcpcd copies the file contents to the generated file /etc/resolv.conf.

SSH login

For SSH login, the user name and the associated password are required. Defaults are shown in section VisionCam login.

Linux host

The ssh program is typically used to login to a remote machine, for example:

~# ssh root@192.168.115.203

The scp program (Secure Copy) can be used to copy files between machines, for example:

~# scp test.txt visioncam@192.168.115.203:/home/visioncam/
~# scp visioncam@192.168.115.203:/home/visioncam/test.txt .

Windows host

There are many programs implementing the SSH protocol. We recommend MobaXterm, which also supports copying files and a X11 server for running remote applications with display output.

Recent Windows versions also provide the optional feature OpenSSH-Client. It contains the command line tools ssh and scp, similar to Linux.

ViewIT Web GUI

The ViewIT software provides access to the VisionCam XM / LM by using a web browser. The framework gives access to the sensor's live view, acquisition parameters, digital I/Os and allows using self-designed image processing algorithms.

Note
The VisionCam EB uses a different web application, see Event-Based System Web Interface.

ViewIT is not part of the basic Linux image, but is normally pre-installed on delivery of new devices.

ViewIT gets installed as Linux service named viewit. Depending on the configuration, the service may be enabled or disabled after booting the system. If the ViewIT package is installed, the state will be shown during console login:

Linux VCXM2209000711 4.19.38-rt19-visioncam-xm-1.0.8.0 #23 SMP PREEMPT Wed Feb 16 09:19:08 CET 2022 armv7l
The programs included with the Debian GNU/Linux system are free software;
the exact distribution terms for each program are described in the
individual files in /usr/share/doc/*/copyright.
Debian GNU/Linux comes with ABSOLUTELY NO WARRANTY, to the extent
permitted by applicable law.
Note: The ViewIT web application is not running.
Use 'systemctl start viewit' to start it temporarily.
Use 'systemctl enable/disable viewit' to control automatic start.
root@VCXM2209000711:~#

In this example, ViewIT is installed but not running yet. It can be started manually by running the command 'systemctl start viewit'.

Note
If the viewit service is running, other processes are not able to use the VisionCam interfaces with the VIBInterface and the FGCamera libraries.

After entering the device's IP address into the address field of a web browser, the main screen appears:

ViewIT
Note
Using the mDNS host name in a browser for accessing ViewIT may cause problems because of delays during the name resolution process.

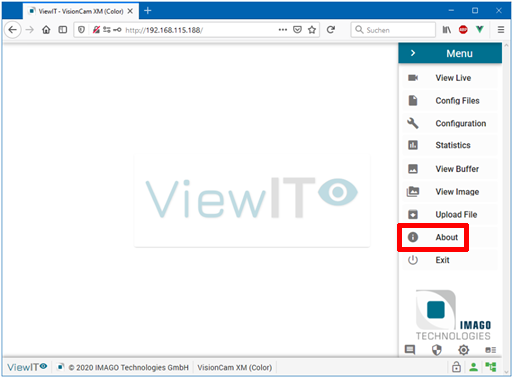
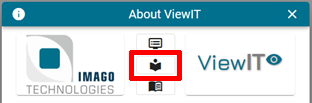
The software documentation can be downloaded from the device by selecting About and then clicking the following symbol:

About

VisionCam EB

Event-Based System Web Interface

The VisionCam EB is deliverd with the pre-installed Event-Based System (EBS) Web Interface software by default. EBS Web Interface provides access to the camera by using a web browser. The framework gives access to the sensor's live view, acquisition parameters, allows to record data, view data and visualize data.

EBS Web Interface gets installed as Linux service named EBWebGUI. Depending on the configuration, the service may be enabled or disabled after booting the system. The following systemctl commands can be used to control the service:

  • systemctl status EBWebGUI: show status information about the service
  • systemctl enable EBWebGUI: enable automatic start
  • systemctl disable EBWebGUI: disable automatic start
  • systemctl start EBWebGUI: start the service manually
  • systemctl stop EBWebGUI: stop the service manually

After entering the device's IP address into the address field of a web browser, the main screen appears:

EBS Web Interface
Note
The default login password for changing the camera configuration in the Web Interface is 'admin'.

Using Metavision on the device

The installed Metavision Open Modules packages include examples for using the event based sensor. See Code Samples & Applications for an overview.

Note
The VisionCam EB has only the Metavision Open Modules pre-installed (GitHub - OpenEB). A Metavision SDK Pro software license is required to run algorithms provided by the Advanced Modules on the device itself. VisionCam EB event streaming can be used to evaluate algorithms on a PC. Prophesee provides a free package of the full Metavision SDK for Windows and Linux PC platforms.
See also: Metavision SDK Modules and Packaging

The following example shows how to build and run the metavision_hal_viewer example:

mkdir build && cd build
cmake /usr/share/metavision/hal/samples/metavision_hal_viewer
cmake --build . --config Release
./metavision_hal_viewer
Note
This example requires a X11 display server, for example by tunneling X11 through SSH by using MobaXterm's integrated X11 server.

x-y-t Event Viewer

The x-y-t Event Viewer is a web page which can be used to load and display recorded events in a web browser (requires WebGL 2.0). Also take a look at recoded examples

VisionCam EB event streaming

The VisionCam EB comes with the Linux service metavision_imago_proxy for streaming sensor events to a Windows or Linux host. IMAGO provides HAL Plugins for Metavision to receive the event stream from the VisionCam. This enables easy evaluation and development of algorithms on a PC by using Prophesee's Metavision SDK.

Note
The EBS Web Interface and the streaming service cannot be used at the same time. The Web Interface service must be stopped in order to use the streaming service.

Metavision HAL Plugin installation

The HAL Plugins are available at the IMAGO Download Portal: Metavision HAL Plugins

Note
The major and minor version numbers of the HAL Plugins package should match the installed Metavision version.
The free evaluation version of the Metavision Intelligence suite can be downloaded here: Metavision Intelligence ESSENTIALS v2.3

For Linux hosts, the plugins are provided as Debian packages which will install the required libraries into the default plugin search path (/usr/lib/metavision/hal/plugins/).

To make the camera visible for Metavision on Windows, the environment variable MV_HAL_PLUGIN_PATH must be created and point to the directory containing the DLL files for the HAL plugins.

Example for setting the environment variable in the Windows console:

set "MV_HAL_PLUGIN_PATH=C:\path_to_imago_plugins\"

See also: Prophesee - Camera Plugins Installation

Using event streaming with Metavision

The Metavision Studio software should detect the camera automatically.

Windows example:

set "MV_HAL_PLUGIN_PATH=C:\path_to_imago_plugins\"
metavision_studio.cmd

For other tools like metavision_viewer, the user has to specify the Serial ID of the camera. The Serial ID can be discovered by using the metavision_platform_info tool.

Example using metavision_platform_info for device discovery on Windows:

metavision_platform_info.exe
...
#### SYSTEMS AVAILABLE ####
# FOUND Imago GEN 3.1 VGA #
Connection Remote
Integrator Imago
Raw Formats EVT2
Sensor Info 3.1
Serial VCXM2209000711@192.168.115.252
System Version 1.0.0
System Version 0x10000
SystemID 162

Example for starting streaming with metavision_viewer using the Serial ID:

metavision_viewer.exe -s VCXM2209000711@192.168.115.252
Simple viewer to stream events from a RAW file or device, using the SDK driver API.
Press SPACE key while running to record or stop recording raw data
Press 'q' or Escape key to leave the program.
Press 'r' to toggle the hardware ROI given as input.
Press 'h' to print this help.
Camera has been opened successfully.