Requirements
- 17-pin power and I/O cable
- 24 V power supply
- Ethernet connection between host and device (through Ethernet switch or directly attached)
- A Windows or Linux host with a terminal program like ssh, MobaXterm or PuTTY
- Internet connection if software updates are desired
IMAGO also offers the following accessories for the VisionCam XM2:
- I/O cable with terminal block (break-out adapter for easy installation and testing)
- M12 Ethernet cable with RJ-45 plug
- Plug-in power supply
- C mount lens
- Lens tube
Power and I/O connector
A 24 V power supply must be connected to the 17-pin power and I/O connector. The device will boot automatically into Linux after applying power.
The following table shows the pin assignment of the connector:

IO connector
|
| Pin | Function | Wire color |
| 1 | GND (supply and I/O) | brown |
| 2 | Power supply (+24 V) | blue |
| 3 | RS-232 TX | white |
| 4 | RS-232 RX | green |
| 5 | Digital IN0 | pink |
| 6 | Digital IN1 | yellow |
| 7 | Digital IN2 | black |
| 8 | Digital OUT0 | gray |
| 9 | Digital OUT1 | red |
| 10 | Digital OUT2 | purple |
| 11 | Digital OUT3 | gray / pink |
| 12 | Digital IN3 | red / blue |
| 13 | USB D+ | white / green |
| 14 | USB D- | brown / green |
| 15 | UART_SEL | white / yellow |
| 16 | RECOVERY | yellow / brown |
| 17 | VBUS (+5 V output) | white / gray |
|
- Note
- Pin 16 RECOVERY must be left open for normal operation.
- Pin 15 UART_SEL: controls UART routing (not available for the Lince5M model):
| I/O Pin 15 | I/O Pin 3/4 | D-SUB RS-232 (if present) |
| Open (default) | /dev/ttyTCU0 | /dev/ttyTHS1 |
| GND | /dev/ttyTHS1 | /dev/ttyTCU0 |
VisionCam login
The following Linux login methods are available:
Two user accounts are pre-installed in the Linux system:
| User | Password | Description |
| root | vision | Superuser account |
| visioncam | vision | Regular user account |
- Note
- We recommend changing the password of both accounts by using the shell command passwd.
Network configuration
The network interface of the VisionCam is configured for DHCP by default.
If no DHCP server is present, the device will fall back assigning a link-local IPv4 address after some time. The link-local address for IPv4 is in the range 169.254.0.0/16.
- Note
- In order to access a device with a IPv4 link-local address, the host must also be configured to use a link-local IPv4 address.
- Windows will automatically fall back to a link-local IPv4 address if no DHCP server is answering the request. So a device can be connected directly to the Windows host if both have DHCP enabled.
- A link-local address is always assigned for the IPv6 protocol (fe80::/10) and can always be used if IPv6 is enabled for the host (see Device access via mDNS name).
VIBFinder tool
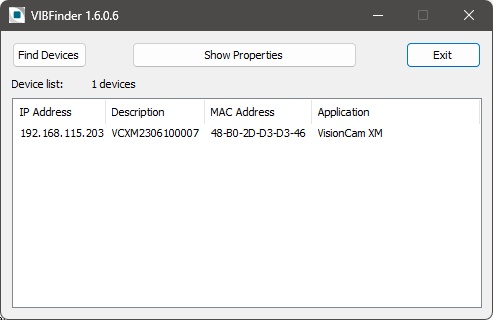
IMAGO's VIBFinder tool for Windows can be used to discover the device on the local network by using the SNMP protocol:

VIBFinder tool
VIBFinder 2 supports the following additional features:
- Support for discovery using the GigE Vision Control Protocol (GVCP)
(requires installed package gige-discovery-reply on the device)
- Finds devices in different subnets
- Support for updating the IPv4 configuration
- Support for Image Backup and Recovery
Device access via mDNS name
Instead of using the device's IPv4 address, it's also possible to establish a connection by using the mDNS host name. The name consists of the device's serial number in the domain .local.
Example:
~# ping VCXM2306100007.local
PING VCXM2306100007.local (192.168.115.203) 56(84) bytes of data.
64 bytes from 192.168.115.203: icmp_seq=1 ttl=64 time=0.020 ms
64 bytes from 192.168.115.203: icmp_seq=2 ttl=64 time=0.045 ms
64 bytes from 192.168.115.203: icmp_seq=3 ttl=64 time=0.047 ms
- Note
- mDNS is supported since Windows 10. Linux hosts require the libnss-mdns package.
- mDNS may resolve the name to a IPv4 or IPv6 address.
Static IPv4 address configuration
A static IP address can be assigned by modifying the file /etc/network/interfaces. This can also be accomblished by using the RS-232 Linux console login.
The file shows some commented lines for setting a static IP address:
# DHCP configuration
# ------------------
auto eth0
iface eth0 inet dhcp
# Static IP configuration
# -----------------------
#auto eth0
#iface eth0 inet static
#address 192.168.1.2
#netmask 255.255.255.0
#gateway 192.168.1.1
When using a static IP address, the file /etc/resolv.conf.tail can be created to configure a DNS server, for example:
echo "nameserver 8.8.8.8" > /etc/resolv.conf.tail
The service dhcpcd copies the file contents to the generated file /etc/resolv.conf.
SSH login
For SSH login, the user name and the associated password are required. Defaults are shown in section VisionCam login.
Linux host
The ssh program is typically used to login to a remote machine, for example:
The scp program (Secure Copy) can be used to copy files between machines, for example:
scp test.txt visioncam@192.168.115.203:/home/visioncam/
scp visioncam@192.168.115.203:/home/visioncam/test.txt .
Windows host
There are many programs implementing the SSH protocol. We recommend MobaXterm, which also supports copying files and a X11 server for running remote applications with display output.
Recent Windows versions also provide the optional feature OpenSSH-Client. It contains the command line tools ssh and scp, similar to Linux.
ViewIT Web GUI
The ViewIT software provides access to the VisionCam XM / LM by using a web browser. The framework gives access to the sensor's live view, acquisition parameters, digital I/Os and allows using self-designed image processing algorithms.
ViewIT is not part of the basic Linux image, but is normally pre-installed on delivery of new devices.
ViewIT gets installed as Linux service named viewit. Depending on the configuration, the service may be enabled or disabled after booting the system. If the ViewIT package is installed, the state will be shown during console login:
Welcome to Ubuntu 20.04.6 LTS (GNU/Linux 5.10.104-rt63-visioncam-xm2-1.0 aarch64)
Documentation: https://help.ubuntu.com
Management: https://landscape.canonical.com
Support: https://ubuntu.com/advantage
Last login: Thu Jun 29 12:25:33 2023
Note: The ViewIT web application is not running.
Use 'systemctl start viewit' to start it temporarily.
Use 'systemctl enable/disable viewit' to control automatic start.
root@VCXM2306100007:~#
In this example, ViewIT is installed but not running yet. It can be started manually by running the command 'systemctl start viewit'.
- Note
- If the viewit service is running, other processes are not able to use the VisionCam interfaces with the VIBInterface and the FGCamera libraries.
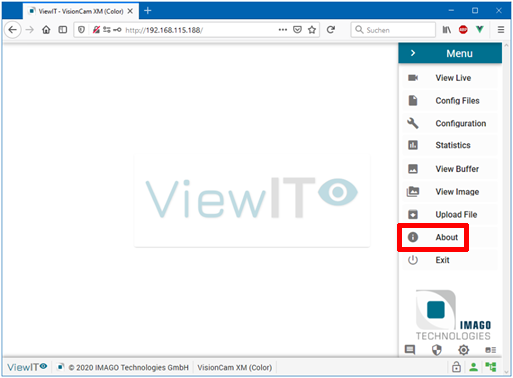
After entering the device's IP address into the address field of a web browser, the main screen appears:

ViewIT
- Note
- Using the mDNS host name in a browser for accessing ViewIT may cause problems because of delays during the name resolution process.
The software documentation can be downloaded from the device by selecting About and then clicking the following symbol:

About


